Two cups wedged together can feel welded shut. The safest, fastest way to unstick cups relies on temperature—not force. By chilling the inner cup with ice and warming the outer cup under hot tap water, you exploit expansion and contraction so they separate in minutes, not hours. Below is a data‑driven guide grounded in published how‑to advice from 2007 to 2018, including step-by-step timing, safety cautions, and last‑resort options.
Key Takeaways
– shows hot-and-cold method recommended since 2007, using ice inside and hot tap water outside, releases most cup stacks within 1–20 minutes. – reveals three independent guides align on thermal expansion—inner contracts, outer expands—reducing stuck friction without force when applied for several minutes. – demonstrates TV demo in 2017 called this the safest, most effective approach and cautioned against WD‑40 for immediate food use. – indicates light lubricants like machine oil or dish soap can aid release if heat‑cold treatment shows no movement after 1–20 minutes. – suggests five sources converge on patience, gentle twisting, and thorough washing after lubricants, minimizing breakage risk without force.
How to unstick cups safely: the proven hot–cold method
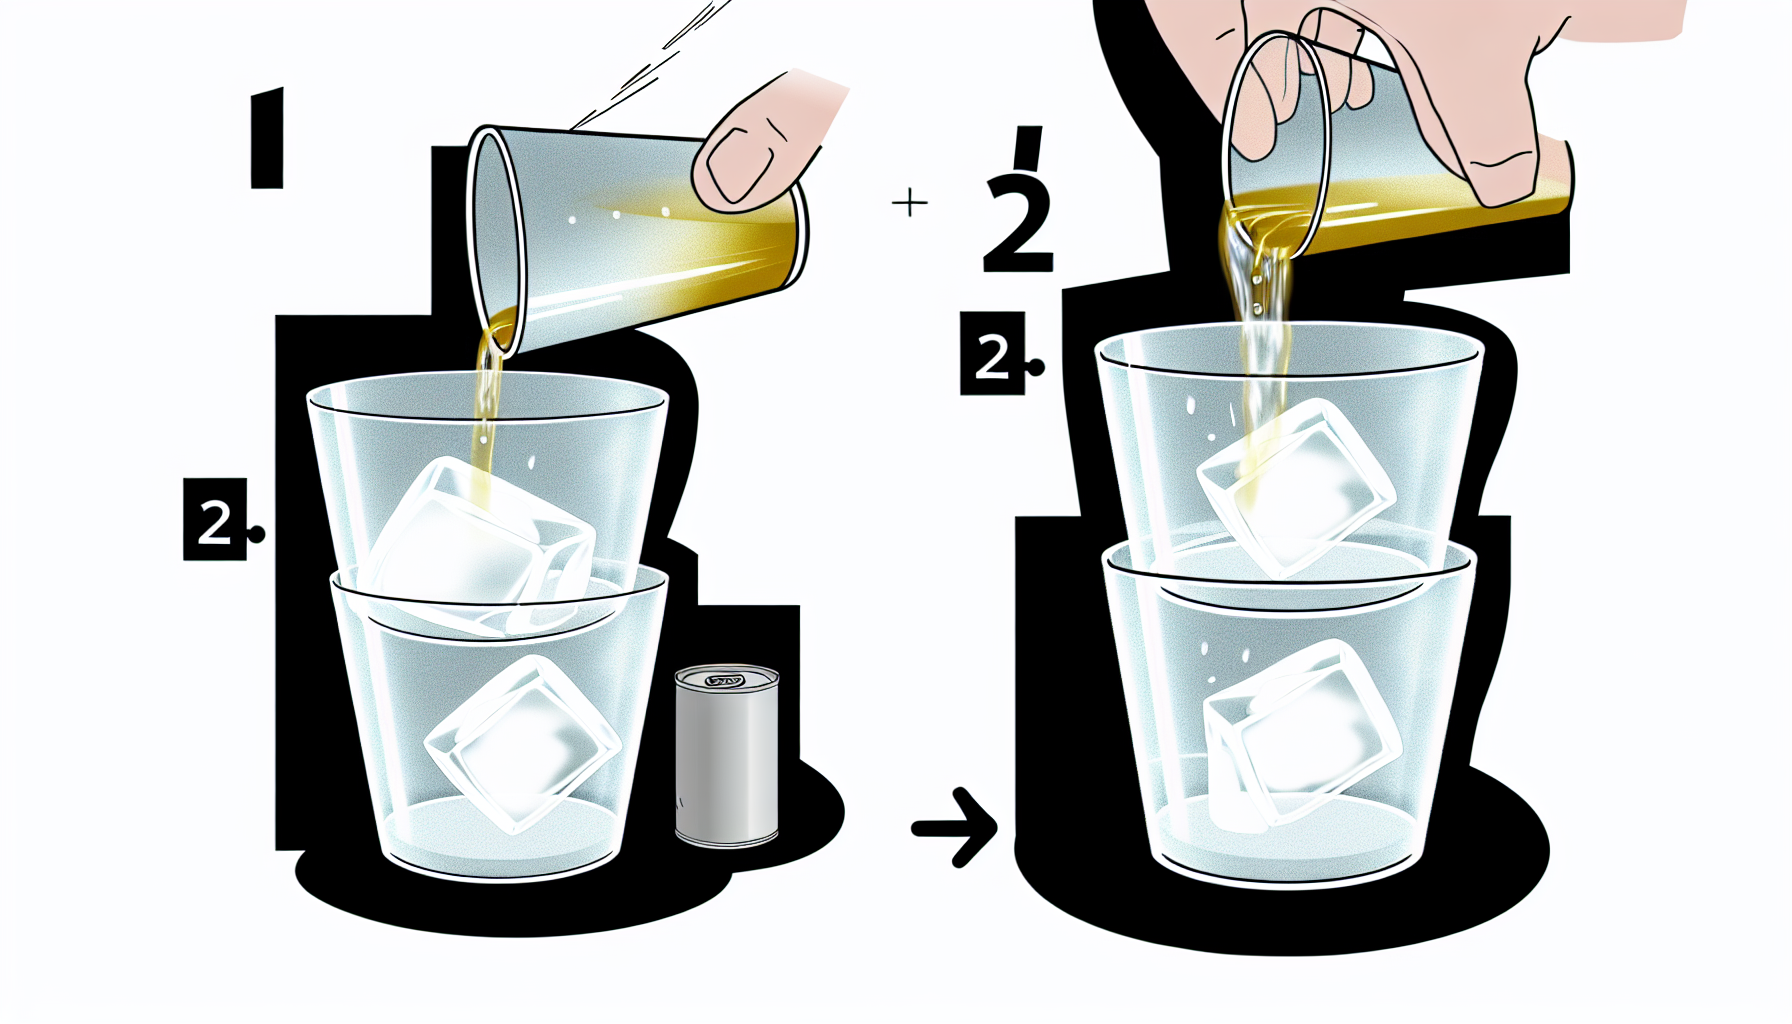
Start by making the inner cup colder and the outer cup warmer. Fill the top/inner cup with ice or ice water. At the same time, submerge only the bottom/outer cup in hot tap water. Wait several minutes to let temperature do the work before attempting any movement.
Good Housekeeping (April 2007) recommends filling the inner cup with ice and bathing the outer cup in hot tap water, then waiting several minutes before a gentle twist; if that fails, drizzle lightweight machine oil at the seam rather than forcing [1].
Give the process time. If you don’t see movement immediately, keep the ice in place and refresh the outer cup’s hot tap water. Gentle twisting—not pulling straight up—keeps stress low and improves the chance of release.
Hunker’s March 5, 2018 update advises rotating the bottom cup under hot tap water for even heating and allowing 1–20 minutes for release, with dish soap or cooking oil as backup lubricants [2].
If the stack begins to shift, stop heating, keep your grip near the rims, and twist with small motions. Once separated, wash both cups to remove any oils or soap, then dry completely.
A 2017 WKYC TV demo calls the hot–cold setup the safest, most effective approach and explicitly warns against using WD‑40 on items intended for immediate food use [3].
Why the temperature trick works
The method exploits basic physics. Heat causes the outer cup to expand slightly while ice makes the inner cup contract. That change reduces friction at the seam. Even small, uniform temperature differences can break the seal formed by moisture and air pressure between tightly nested surfaces.
Hot tap water is key. It’s warm enough to expand the outer cup compared with a chilled inner cup, but not so extreme that you risk cracking glass from thermal shock. Ice in the inner cup boosts the temperature differential without harming the material.
Time matters because materials don’t heat or cool instantly. Waiting several minutes allows heat to sink into the outer cup and cold to draw through the inner cup, making the gap wide enough for a safe twist. Rotating the stack in hot tap water helps the outer cup warm evenly around its circumference.
When lubrication helps—and how to apply it
If the hot–cold cycle shows no movement after 1–20 minutes, add a lubricant at the seam. Dish soap, olive oil, or a similar light fluid can penetrate the narrow gap and reduce friction. Apply a small bead around the rim where the cups meet, wait a minute for it to creep in, then retry the temperature method and gently twist.
HouseDigest frames WD‑40 strictly as a last‑resort lubricant—apply a small amount at the seam, avoid thermal shock, and wash thoroughly to remove any residue before reuse [4].
If you do use a lubricant, plan on washing both cups thoroughly with hot, soapy water before putting them back into service. Detergent removes oil films that could otherwise affect taste or safety in later use.
Kipkis lays out a progressive escalation: start with several minutes of thermal expansion, then light lubricants like olive oil or dish soap, and only then consider WD‑40, followed by thorough washing [5].
What not to do when you unstick cups
Don’t force it. Pulling straight up, prying with tools, or tapping the rims can create point stresses that chip, crack, or shatter glass. If a twist doesn’t budge with light pressure, return to temperature adjustments and patience.
Avoid boiling water or sudden plunges into very hot or very cold baths. Rapid temperature swings can induce thermal shock, especially in glass, risking breakage. Stick with hot tap water for the outer cup and ice or very cold water for the inner cup.
Skip sprays not intended for kitchenware if you plan to use the cups immediately. If you use any non-food lubricant as a last resort, scrub thoroughly before reuse to remove residues. When in doubt, choose dish soap or edible oil and a second round of hot–cold cycling.
Timing benchmarks: how long to wait and when to retry
A practical window is 1–20 minutes for the thermal method to work, depending on cup thickness and material. Check every few minutes by attempting a gentle twist. If you feel slight movement, keep the temperature differential going and twist incrementally rather than trying to finish in one motion.
After 5–10 minutes with no progress, refresh your hot tap water to maintain warmth at the outer cup. Replace melted ice in the inner cup. If still stuck after 20 minutes, try a thin line of dish soap or cooking oil at the seam, wait briefly, and repeat the temperature routine.
Prevent stuck cups in the future
Dry completely before nesting. Residual moisture can create a micro-seal between smooth surfaces as water cools and pressure equalizes. A quick towel dry and a few minutes of air-drying reduce the risk.
Avoid tightly nesting cups of identical size, especially when they’re still warm from the dishwasher. If storage demands nesting, place a small paper towel, napkin, or silicone spacer between cups to break the seal path.
Store cups upright rather than fully nested when possible. If you frequently stack them, alternate sizes to maintain clearance. In the sink, don’t drop one cup directly into another—rinse side-by-side to prevent accidental wedging.
Material considerations: glass vs. plastic
Glass tolerates hot tap water and ice differentials better than boiling water but is more susceptible to thermal shock from extremes. Keep temperatures moderate and changes gradual. Use light torque, not prying, because chips can propagate into cracks.
Many plastics soften slightly under heat, which can help the outer cup expand. Use only hot tap water, not near-boiling, to avoid warping. Plastic also benefits from dish soap lubrication, which is easy to rinse and safe for food-contact items.
Troubleshooting stubborn cases
If you see a thin water film trapped between the cups, a lubricant may be especially helpful because it displaces water and reduces surface tension. Let the lubricant sit briefly so capillary action can draw it deeper.
Try changing grips. Holding the outer cup with a rubber jar opener or a silicone trivet increases friction without adding force. For the inner cup, a dry towel helps you apply controlled, even torque.
If your cups are decorative, thin, or heirloom pieces, prioritize safety. Work over a towel-lined sink to cushion accidental drops, and stop immediately if you hear a pinging or cracking sound. It’s better to repeat the temperature cycle than to risk damage.
Quick checklist to unstick cups now
– Ice in inner cup; hot tap water on the outer cup. – Wait several minutes; refresh temperatures as needed. – Twist gently, don’t pull straight up. – Add dish soap or edible oil at the seam if needed. – Reserve WD‑40 as a last resort; wash thoroughly before reuse.
Sources:
[1] Good Housekeeping – How to Separate Stuck Glassware: www.goodhousekeeping.com/home/cleaning/tips/a19784/heloise-glassware-stuck-apr07/” target=”_blank” rel=”nofollow noopener noreferrer”>https://www.goodhousekeeping.com/home/cleaning/tips/a19784/heloise-glassware-stuck-apr07/
[2] Hunker – How To Unstick Plastic Glasses: www.hunker.com/13420130/how-to-unstick-plastic-glasses/” target=”_blank” rel=”nofollow noopener noreferrer”>https://www.hunker.com/13420130/how-to-unstick-plastic-glasses/ [3] WKYC (CBS affiliate) – Lynna’s Life Hacks: Easiest way to separate stuck glassware: https://www.wkyc.com/article/life/lynnas-life-hacks-easiest-way-to-separate-stuck-glassware/95-488357583
[4] HouseDigest – How To Separate Stuck Glassware With WD‑40: www.housedigest.com/1272844/how-to-separate-stuck-glassware-with-wd-40/” target=”_blank” rel=”nofollow noopener noreferrer”>https://www.housedigest.com/1272844/how-to-separate-stuck-glassware-with-wd-40/ [5] Kipkis – Separate Stuck Glasses: https://kipkis.com/Separate_Stuck_Glasses
Image generated by DALL-E 3


Leave a Reply